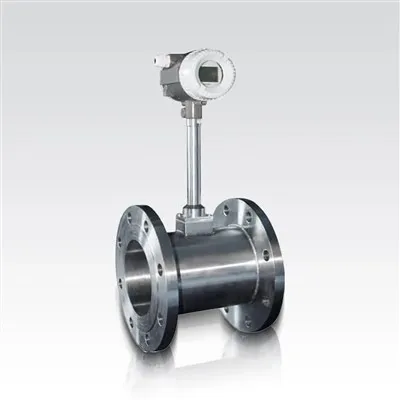
How to install a Vortex Flowmeter with a proper straight - pipe section?
Leave a message
As a trusted Vortex Flowmeter supplier, I understand the importance of a proper installation process, especially when it comes to ensuring the correct straight - pipe section. A Vortex Flowmeter is a widely used device for measuring the flow rate of liquids, gases, and steam in various industrial applications. However, its performance can be significantly affected by the installation conditions, particularly the length of the straight - pipe section upstream and downstream of the flowmeter. In this blog, I'll share some insights on how to install a Vortex Flowmeter with a proper straight - pipe section.
Understanding the Role of the Straight - Pipe Section
Before delving into the installation process, it's crucial to understand why the straight - pipe section is so important. When fluid flows through a pipeline, it can develop irregular flow patterns due to various factors such as elbows, valves, and other pipeline components. These irregular flow patterns can cause disturbances in the flow, which in turn can affect the accuracy of the Vortex Flowmeter.
The straight - pipe section serves as a buffer zone that allows the fluid to regain a fully developed, laminar flow profile before it reaches the flowmeter. This ensures that the flowmeter can accurately measure the flow rate based on the formation and shedding of vortices in the fluid stream. Without a proper straight - pipe section, the flowmeter may produce inaccurate readings, leading to potential errors in process control and measurement.
Determining the Required Straight - Pipe Length
The required length of the straight - pipe section depends on several factors, including the type of upstream and downstream pipeline components, the pipe diameter, and the flow characteristics. Generally, the upstream straight - pipe length is more critical than the downstream length, as it is where the flow disturbances are most likely to occur.
- Upstream Straight - Pipe Length: For most applications, a minimum upstream straight - pipe length of 15 - 20 times the pipe diameter (D) is recommended. However, if there are elbows, tees, or other flow - disturbing components upstream of the flowmeter, a longer straight - pipe length may be required. For example, if there is a single 90 - degree elbow upstream, a minimum of 20D of straight pipe is typically recommended. If there are multiple elbows or other complex pipeline configurations, the upstream straight - pipe length may need to be increased to 30D or more.
- Downstream Straight - Pipe Length: The downstream straight - pipe length is generally less critical than the upstream length. A minimum of 5 - 10D of straight pipe downstream of the flowmeter is usually sufficient to ensure that the flowmeter can accurately measure the flow rate. This downstream straight - pipe section helps to stabilize the flow after it has passed through the flowmeter and reduces the potential for back - pressure effects.
It's important to note that these are general guidelines, and the specific requirements may vary depending on the manufacturer's recommendations and the specific application. Always refer to the Vortex Flowmeter installation manual for the exact straight - pipe length requirements for your particular model.
Selecting the Installation Location
Once you have determined the required straight - pipe length, the next step is to select the appropriate installation location for the Vortex Flowmeter. Here are some key considerations:
- Accessibility: Choose a location that is easily accessible for installation, maintenance, and calibration. This will make it easier to perform routine inspections and repairs on the flowmeter without causing significant disruptions to the process.
- Avoidance of Vibrations: Vortex Flowmeters are sensitive to vibrations, which can interfere with the accurate measurement of flow. Therefore, it's important to select a location that is away from sources of vibration, such as pumps, compressors, or other vibrating equipment. If vibrations cannot be avoided, consider using vibration - isolation mounts or other measures to reduce the impact of vibrations on the flowmeter.
- Proximity to Other Equipment: Ensure that the flowmeter is installed at a sufficient distance from other equipment, such as valves, pumps, or heat exchangers. This will help to minimize the potential for flow disturbances and ensure that the flowmeter can accurately measure the flow rate.
- Level Installation: The Vortex Flowmeter should be installed in a horizontal or vertical position, depending on the manufacturer's recommendations. In a horizontal installation, the flowmeter should be installed with the sensor in the horizontal plane to ensure accurate measurement. In a vertical installation, the flow should be flowing upward to prevent the accumulation of air or gas bubbles in the flowmeter.
Preparing the Pipeline for Installation
Before installing the Vortex Flowmeter, it's important to prepare the pipeline to ensure a proper fit and installation. Here are the steps to follow:
- Clean the Pipeline: Thoroughly clean the pipeline to remove any debris, dirt, or rust that may be present. This will help to prevent damage to the flowmeter and ensure accurate measurement.
- Check the Pipe Alignment: Ensure that the pipeline is properly aligned and that the pipe flanges are parallel and concentric. Misaligned pipes can cause stress on the flowmeter and lead to inaccurate readings. Use a pipe alignment tool to check the alignment and make any necessary adjustments.
- Install Gaskets and Seals: Use high - quality gaskets and seals to ensure a leak - tight connection between the flowmeter and the pipeline. Make sure that the gaskets are the correct size and material for the application.
Installing the Vortex Flowmeter
Once the pipeline is prepared, you can proceed with the installation of the Vortex Flowmeter. Here are the general steps:
- Position the Flowmeter: Carefully position the Vortex Flowmeter in the pipeline at the selected installation location, ensuring that it is centered and aligned with the pipe.
- Connect the Flanges: Bolt the flowmeter flanges to the pipeline flanges using the appropriate bolts and nuts. Tighten the bolts evenly in a criss - cross pattern to ensure a uniform seal.
- Connect the Electrical Wiring: Connect the electrical wiring of the Vortex Flowmeter according to the manufacturer's instructions. This typically includes connecting the power supply, signal output, and grounding wires.
- Perform a Leak Test: After the flowmeter is installed, perform a leak test to ensure that there are no leaks in the pipeline or at the flowmeter connections. This can be done by pressurizing the pipeline with a test fluid and checking for any signs of leakage.
Calibration and Commissioning
After the Vortex Flowmeter is installed, it's important to calibrate and commission the flowmeter to ensure accurate measurement. Calibration involves adjusting the flowmeter to match a known reference standard, while commissioning involves verifying that the flowmeter is operating correctly and providing accurate readings in the actual process.
- Calibration: Calibration should be performed by a qualified technician using a calibrated flow standard. The calibration process typically involves adjusting the flowmeter's zero and span settings to ensure that the output signal corresponds to the actual flow rate.
- Commissioning: During commissioning, the flowmeter should be tested under normal operating conditions to verify its accuracy and performance. This may involve comparing the flowmeter readings with other independent flow measurement devices or using a flow calibration rig.
Other Flowmeter Options
In addition to Vortex Flowmeters, there are other types of flowmeters available for different applications. For example, the LDG Electromagnetic Flowmeter is suitable for measuring the flow rate of conductive liquids, while the Turbine Flow Meter is often used for measuring the flow rate of clean liquids and gases. Each type of flowmeter has its own advantages and limitations, and the choice of flowmeter depends on the specific application requirements.
Conclusion
Installing a Vortex Flowmeter with a proper straight - pipe section is essential for ensuring accurate and reliable flow measurement. By following the guidelines outlined in this blog, you can select the appropriate installation location, determine the required straight - pipe length, and install the flowmeter correctly. Remember to always refer to the manufacturer's recommendations and installation manual for the specific requirements of your Vortex Flowmeter.


If you are interested in purchasing a Vortex Flowmeter or need further assistance with installation and calibration, please feel free to contact us. Our team of experts is available to provide you with the best solutions for your flow measurement needs.
References
- Vortex Flowmeter Installation Manuals from various manufacturers.
- Industrial Flow Measurement Handbook.
- ASME MFC - 14M - 2001, Measurement of Fluid Flow in Pipes Using Vortex Flowmeters.