How to connect multiple ceramic pressure transmitters in a system?
Leave a message
Hey there! As a supplier of Ceramic Pressure Transmitters, I often get asked about how to connect multiple ceramic pressure transmitters in a system. It's a crucial question, especially for those looking to monitor different pressure points in various applications. So, let's dive right into it and break down the process step by step.
Understanding the Basics of Ceramic Pressure Transmitters
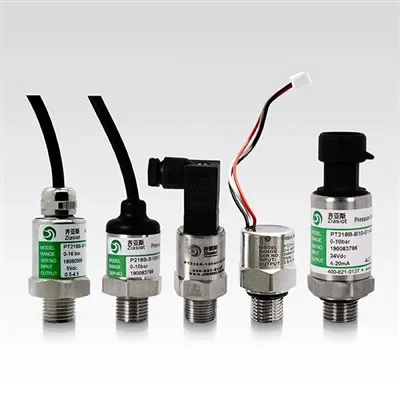
Before we start talking about the connection process, let's quickly go over what ceramic pressure transmitters are. These transmitters are designed to measure pressure accurately using a ceramic sensing element. They're known for their high accuracy, long - term stability, and resistance to harsh environments.
We offer different types of ceramic pressure transmitters, like the Refrigeration Pressure Transmitter, which is specifically tailored for refrigeration systems. The Standard Ceramic Pressure Transmitter is a versatile option for general - purpose pressure measurement, and the Anti - Crossive Pressure Transmitter is great for applications where cross - interference needs to be minimized.
Planning Your System
The first step in connecting multiple ceramic pressure transmitters is to plan your system properly. You need to figure out where each transmitter will be placed and what kind of pressure they'll be measuring.
![]()

- Identify Pressure Points: Walk around the system you're working on and mark all the points where you need to measure pressure. This could be in a manufacturing plant, a water treatment facility, or even a HVAC system. Make a list of these points and note down the expected pressure ranges at each location.
- Choose the Right Transmitters: Based on the pressure ranges and the environment at each point, select the appropriate ceramic pressure transmitters. For example, if you're measuring high - pressure steam in a boiler, you'll need a transmitter that can handle those extreme conditions.
- Determine the Communication Protocol: Decide on the communication protocol you'll use to connect the transmitters to your control system. Common protocols include 4 - 20 mA, Modbus, and HART. The choice depends on the capabilities of your control system and the distance between the transmitters and the control unit.
Physical Installation
Once you've planned your system, it's time to install the transmitters physically.
- Mounting the Transmitters: Each ceramic pressure transmitter comes with mounting instructions. Usually, they can be mounted on a wall, a pipe, or a panel. Make sure to mount them securely to avoid any vibrations that could affect the measurement accuracy. Use the appropriate mounting brackets and hardware provided with the transmitters.
- Connecting the Pressure Ports: Connect the pressure ports of the transmitters to the pressure points in your system. You'll need to use appropriate tubing or pipes to make these connections. Ensure that the connections are tight and leak - free. A small leak can lead to inaccurate pressure readings.
- Wiring the Transmitters: Connect the electrical wires of the transmitters according to the chosen communication protocol. If you're using a 4 - 20 mA protocol, connect the positive and negative wires to the corresponding terminals on the control system. Make sure to follow the color - coding and wiring diagrams provided with the transmitters.
Electrical Configuration
After the physical installation, you need to configure the electrical settings of the transmitters.
- Power Supply: Provide the correct power supply to each transmitter. Most ceramic pressure transmitters operate on a 24 VDC power supply, but it's always best to double - check the specifications.
- Calibration: Calibrate each transmitter to ensure accurate pressure measurement. You can use a calibration tool or a reference pressure source to adjust the output of the transmitter. Follow the calibration procedure outlined in the user manual.
- Addressing (if applicable): If you're using a communication protocol that requires addressing, such as Modbus, assign a unique address to each transmitter. This allows the control system to distinguish between different transmitters and receive data from them correctly.
Testing and Troubleshooting
Once everything is installed and configured, it's time to test the system.
- Power On the System: Turn on the power supply to the transmitters and the control system. Check if all the transmitters are powered on and communicating with the control system.
- Check the Readings: Compare the pressure readings from the transmitters with the expected values. If there are significant discrepancies, there could be an issue with the installation, calibration, or wiring.
- Troubleshoot Problems: If you encounter any problems, start by checking the physical connections. Make sure all the tubing, pipes, and wires are properly connected. If the issue persists, refer to the troubleshooting section of the transmitter's user manual or contact our technical support team.
Maintenance and Monitoring
After the system is up and running, regular maintenance and monitoring are essential to ensure its long - term performance.
- Periodic Inspections: Conduct regular inspections of the transmitters and their connections. Check for any signs of wear, damage, or leaks. Replace any faulty components immediately.
- Calibration Checks: Periodically check the calibration of the transmitters to ensure accurate measurement. Over time, the calibration may drift, and you may need to recalibrate the transmitters.
- Software Updates: If your transmitters support software updates, make sure to keep them up - to - date. Software updates can improve the performance and functionality of the transmitters.
Conclusion
Connecting multiple ceramic pressure transmitters in a system may seem like a complex task, but if you follow these steps, it can be a smooth process. Planning, proper installation, electrical configuration, testing, and maintenance are all key factors in ensuring the success of your pressure measurement system.
If you're interested in purchasing ceramic pressure transmitters for your project or have any questions about the connection process, don't hesitate to reach out. We're here to help you every step of the way and ensure that you get the most accurate and reliable pressure measurement solution.
References
- Manufacturer's manuals for Ceramic Pressure Transmitters
- Industry standards for pressure measurement and communication protocols